
 Alex Tamm
Table of Contents
Converting Bitcoin (BTC) to Tether (USDT) is straightforward when you use a wallet-to-wallet cryptocurrency swap. Instead of selling BTC for cash and buying a stablecoin again, you can exchange Bitcoin directly for USDT in a single transaction. Most non-custodial swap services let you complete the process without creating an account, while sending the Tether straight to your own wallet.

In this guide, you’ll learn how to convert BTC to USDT step by step, what you’ll need, how fixed and floating rates differ, how long it takes, what fees to expect, and the common mistakes to avoid. The one step you cannot get wrong on this pair is the USDT network: Tether lives on several chains, and receiving it on a network your wallet doesn’t support — or one that doesn’t match the swap’s payout — is the most common way funds go missing on a BTC to USDT swap.
Why Convert Bitcoin to Tether?
To lock in value and step out of volatility. Bitcoin’s price moves; a dollar-pegged stablecoin doesn’t. Holders convert BTC to USDT to take profit, to park gains in a stable position between trades, or to de-risk a portfolio without cashing out to a bank. USDT is the “dry powder” you hold ready to redeploy; Bitcoin is the volatile asset you’re stepping out of for now.
Be clear on one thing: Bitcoin and Tether are both transparent public ledgers. Converting BTC to USDT does not make your funds private or untraceable — both chains are fully visible. What a non-custodial swap gives you is operational convenience: no account, no ID, and any volume. One structural fact worth knowing, stated plainly and not as a scare: Tether, the company behind USDT, controls the token — its contracts can freeze specific addresses. That’s the trade-off of holding an issuer-controlled stablecoin instead of a decentralized asset; it is not a prediction that USDT will lose its peg.
Weighing whether now is the moment to move out of BTC? That’s an investment question, not a how-to one — see the BTC price outlook or the Tether outlook for that. Note too that Bitcoin and USDT run on separate chains, so this is a cross-chain swap, not a wallet transfer.
Godex.io is a non-custodial instant cryptocurrency exchange operating since 2017. It supports 936+ coins, requires no registration or KYC at any transaction size, and offers both fixed-rate and floating-rate swap modes. Processing time is 5–30 minutes after deposit confirmation.
What You Need Before You Start
You need three things: the Bitcoin you want to swap, a wallet that can receive USDT — and knowledge of which network it supports — and a browser. No account, no email, no ID.
- Bitcoin to swap — held in any wallet you can send from (Electrum, Sparrow, BlueWallet, Ledger, Trezor, or Exodus). A non-custodial wallet means you hold the keys; no third party controls the funds.
- A wallet that can receive USDT — and you know which network it supports (ERC-20 on Ethereum, TRC-20 on Tron, Solana, and so on). This matters more here than on any other pair, because USDT exists on several chains at once, and your receiving wallet only accepts it on the networks it supports.
- A browser — desktop or mobile works.
What you do not need: no account, no email, no phone number, no passport or selfie, and no upper volume cap — you can swap any amount, from a small position to a large one, the same way.
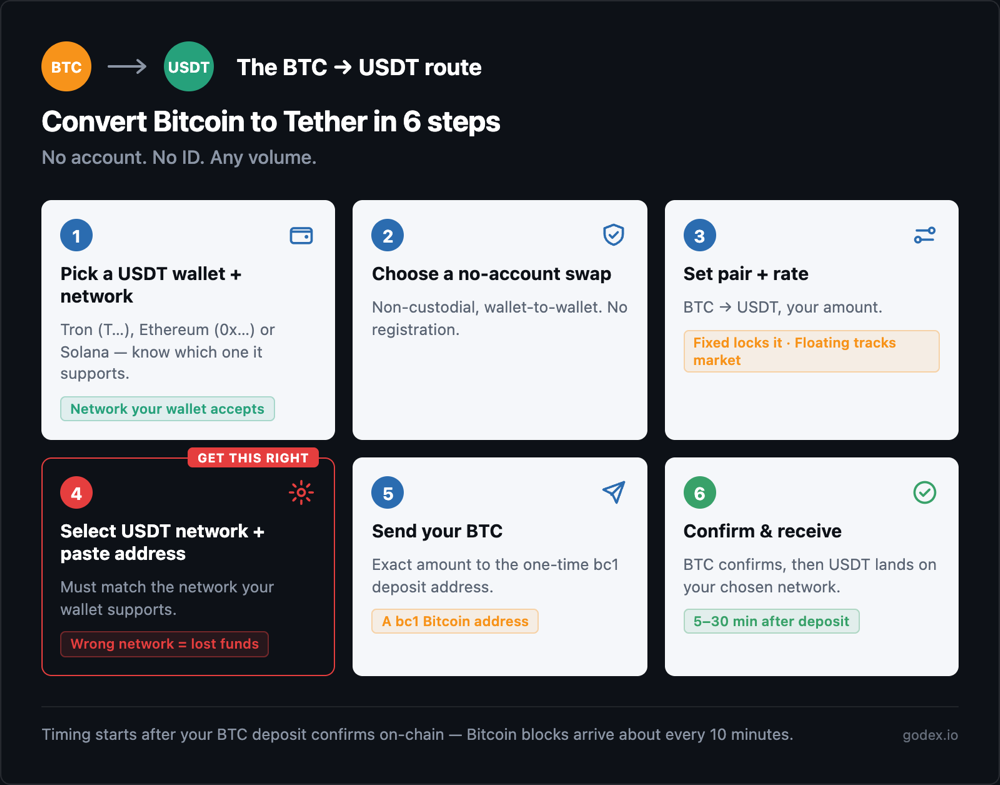
Step 1 — Pick a Wallet to Receive Your USDT (and Confirm Its Network)
Pick a wallet that can receive USDT before you swap — and, critically, know which network it accepts USDT on. USDT is not one token; it’s the same token issued on several chains, and your wallet only recognizes it on the networks it supports.
- A Tron/TRC-20 wallet receives USDT at an address starting
T…. - An Ethereum/ERC-20 wallet (MetaMask, Ledger, Trezor, and most EVM wallets) receives USDT at an address starting
0x…. - A Solana wallet (Phantom, Solflare) receives USDT at a longer base58 address.
There’s no single “best” — the right network is the one your receiving wallet actually supports. If you’re receiving into a centralized exchange account, check which USDT networks it credits before you swap; sending on a network it doesn’t support can strand the funds. When you first open a self-custody wallet, it will ask you to save a recovery phrase — write it down and keep it offline, it’s your only backup if you lose the device. Because the wallet is non-custodial, you hold the keys and the swap sends USDT straight to you — no intermediary holds it.
Step 2 — Choose a Non-Custodial, No-Account Swap
Choose a non-custodial exchange that supports the BTC to USDT pair without registration. Godex.io is the path this guide uses: it has run since 2017 across 936+ coins, asks for no account or ID at any volume, and settles the swap wallet-to-wallet.
For this pair, “non-custodial, no-account” buys you something concrete: no account to create, no ID to submit, and no upper limit on the amount. You provide a receiving address; the exchange never holds your funds on a balance to be frozen. This is a convenience-and-self-custody benefit — not a privacy one. BTC and USDT are both transparent public ledgers, and swapping between them does not make your funds private or untraceable.
Before you start, make sure you’re actually on godex.io — bookmark it. (godex.pro is a known scam; the official platform is only at godex.io.)
When you’re ready, swap BTC to USDT on Godex — that’s the page where this route happens. Prefer to see the screens first? Here’s the exact Godex walkthrough, step by step. Comparing providers first? Weigh your options in this rundown of the top BTC to USDT exchanges — then come back here for the how-to.
Step 3 — Set the Pair and Choose Fixed or Floating Rate
Set “you send” to BTC and “you get” to USDT, enter your amount, then choose your rate mode. Fixed rate locks the BTC/USDT ratio the moment you start — the USDT amount you see is the amount you receive, regardless of how Bitcoin’s price moves while your deposit confirms. Floating rate moves with the market until the swap completes.
Because you’re stepping out of Bitcoin’s volatility into a dollar-pegged asset, the rate mode is really a question of how much of that volatility you want to carry during the swap. Here’s the trade-off:
- Fixed rate locks your quoted USDT amount and shields you from Bitcoin’s price drift while the swap runs. You pay a small spread for that certainty. This matters most on larger swaps, where a few points of drift is real money — and it matters here specifically because Bitcoin’s ~10-minute blocks mean the deposit can take a while to confirm.
- Floating rate stays exposed to Bitcoin’s movement until the deposit confirms. It’s fine for small swaps, where a few minutes of drift is trivial.
One thing fixed rate does NOT do: wait forever. On Godex the fixed rate holds as long as your BTC deposit arrives within 30 minutes of creating the transaction. Arrive later and the swap may re-rate to the current floating rate. The fix is simple: send promptly. Bitcoin blocks arrive about every 10 minutes, so a fixed-rate deposit that sits unconfirmed can eat into that window — set an adequate network fee so your BTC confirms without dragging.
Swaps also carry a small minimum, which the form shows the moment you enter an amount. Sending below it triggers a refund to your refund address rather than completing the swap — worth knowing if you’re running a small test swap first.
Step 4 — Select Your USDT Network and Paste Your Receiving Address
This is the step that decides whether your swap succeeds at all. Before you paste an address, choose the network you want to receive USDT on — Ethereum (ERC-20), Tron (TRC-20), Solana, and others — and make sure it’s a network your receiving wallet actually supports. Three things must line up: the network you select in the form, the receiving address you paste, and the network your wallet expects that USDT on.
Then open your wallet, copy the USDT receiving address for that same network, and paste it into the swap’s address field. Use copy-paste or the QR code; never type a crypto address by hand.
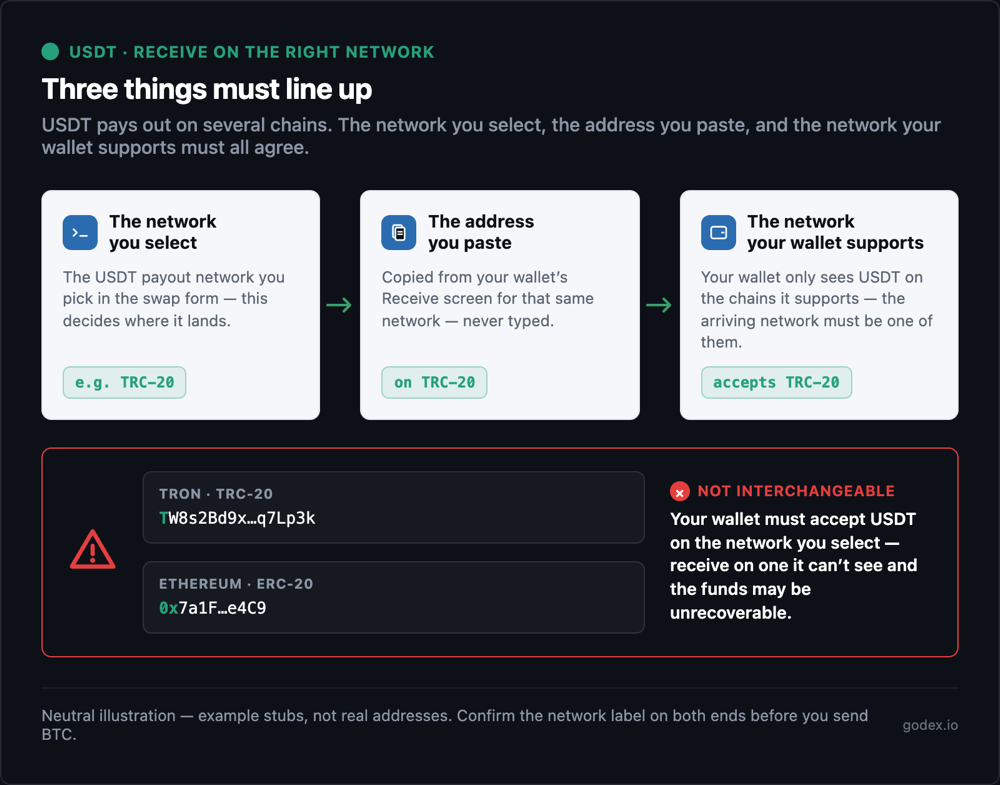
Here’s why it’s the make-or-break step:
- Receiving on a network your wallet doesn’t support is the single most common way stablecoin swaps go wrong. If the swap pays out USDT on Ethereum (ERC-20) but you pasted a Tron (TRC-20) address — or your wallet can’t see USDT on the chain it arrived on — the funds may be stranded or unrecoverable. There’s no undo.
- How to tell the networks apart by address format: a Tron/TRC-20 USDT address starts
T…; an Ethereum/ERC-20 address starts0x…. USDT on BNB Chain (BEP-20) also uses the0x…format (it’s an Ethereum-style address), so don’t rely on the prefix alone there — select the network label, not just the leading characters. Solana USDT uses a longer base58 address (no0xorTprefix). None of these are interchangeable, even though all of them hold “USDT.” - Match the address to the selected network. The address you paste must be a receiving address for the exact network you chose in the swap form. A
0x…Ethereum address cannot receive USDT that pays out on Tron, and vice versa. - Verify the address by its ends, not the whole string. Compare the first four or five and the last four or five characters of the address you pasted against what your wallet shows — that’s how you catch a swapped or clipboard-hijacked address without squinting at 40 characters.
- Practical network notes (factual, not a Godex fee claim): TRC-20 (Tron) is typically fastest and cheapest to receive on; ERC-20 (Ethereum) is the most widely supported, but its network cost varies with congestion. Pick based on where you actually want the USDT to land and what your wallet supports.
- The rule: confirm the network label on both ends — the network you selected in the swap and the network your receiving wallet supports — before you send anything.
Step 5 — Send Your BTC to the One-Time Deposit Address
The exchange shows a one-time Bitcoin deposit address for this specific swap. Send the exact BTC amount quoted to that address from your wallet. The swap starts once your BTC deposit confirms on-chain.
- The deposit address is single-use for this swap — don’t reuse it for a later one. A
bc1native-SegWit address is the modern Bitcoin default. - Send the exact amount quoted. Under- or over-sending can delay the swap or trigger a re-rate.
- No memo or destination tag is needed for Bitcoin (unlike XRP or XLM). Leave any tag field blank.
- Set an adequate network fee so your BTC confirms promptly — a fee that’s too low can leave the deposit stuck for a long time, which matters on a fixed-rate quote with a 30-minute window.
- Fill in the refund address. Godex provides a refund-address field — use it. On a no-account flow, a failed or below-minimum deposit needs somewhere to return to; without one, recovery is slow and manual.
Before you send your BTC — a 30-second checklist
- ✓ USDT network matches on both ends — the network you selected in the swap equals the network your receiving wallet supports (
T…= Tron,0x…= Ethereum)- ✓ USDT receiving address matches the selected network — pasted from your wallet, never typed
- ✓ BTC deposit is a
bc1…Bitcoin address you’re sending to, with an adequate network fee- ✓ Confirm the quoted amount matches exactly what you’re sending
- ✓ Save the transaction ID so you can track the swap without logging in
- ✓ Fill in the refund address — Godex provides the field
Ready to run it? Swap BTC to USDT on Godex.
Step 6 — Wait for Confirmations and Receive Your USDT
Bitcoin confirms in blocks that arrive about every 10 minutes, so the deposit side is the main wait on this pair — slower than a stablecoin-input pair, where the deposit clears in seconds. Once your BTC deposit reaches the required confirmations, the exchange sends your USDT to the address you provided, on the network you selected. On Godex the swap completes 5–30 minutes after the deposit is received.
Track the whole thing by transaction ID — no login needed — as the status moves through deposit received → exchanging → sending → complete. To verify on-chain, check your transaction hash on a block explorer: mempool.space for the BTC side, or Tronscan / Etherscan for the USDT side, depending on which network you received on. If a swap takes longer than you expect, Godex support is available 24/7 — reach out with your transaction ID and they can step in.
How Long Does a BTC to USDT Swap Take?
A BTC to USDT swap usually completes in a few to about 30 minutes. The main variable is Bitcoin’s deposit confirmation — its blocks arrive about every 10 minutes, so the deposit side is the wait on this pair — after which the USDT is sent almost immediately on whichever network you chose. On Godex the swap completes 5–30 minutes after the deposit is received.
Because the input asset is Bitcoin, the deposit confirmation is slower than on a stablecoin- or Litecoin-input pair, where the deposit clears in seconds or minutes. Setting an adequate BTC network fee keeps that confirmation from dragging. The USDT payout follows quickly once your BTC confirms — TRC-20 and Solana settle in seconds, ERC-20 in a minute or two. Always read swap timing as “after the deposit is received,” not from the moment you click start.
What Fees Should You Expect on a BTC to USDT Swap?
Two costs sit on a BTC to USDT swap, and neither is a separate up-front “swap fee”:
- The Bitcoin network fee. When you send BTC to the deposit address, your wallet pays a miner fee to the Bitcoin network — not to the exchange. This fee rises and falls with network congestion, and setting it too low can leave your deposit stuck. Your sending wallet sets this fee, so check it there before you send. Note that the USDT payout network can carry its own cost too: the exchange delivers your USDT on the network you selected, and networks like Ethereum (ERC-20) are more expensive to move on than Tron (TRC-20) — something to weigh when you pick the receive network in Step 4.
- The exchange’s spread. A non-custodial swap doesn’t bill a visible line-item fee — its margin is built into the rate you’re quoted. The “you get” USDT figure is already net of that spread, so what you see is what arrives. A fixed-rate quote carries a slightly wider spread than floating, because you’re paying for rate certainty while your deposit confirms.
There’s no account fee, deposit fee, or withdrawal fee on a non-custodial wallet-to-wallet swap — you hold no balance to be charged on. Because a swap’s cost is baked into the rate rather than shown as a percentage, the figure that actually matters is the quoted “you get” amount: that’s your real, all-in result in a single number.
Common BTC to USDT Mistakes to Avoid
Most BTC to USDT issues come down to the USDT network, the address, or the rate mode — all avoidable.
- Receiving USDT on a network your wallet doesn’t support — the #1 loss on this pair. Match the network you select in the swap, the address you paste, and the network your wallet expects (
T…= Tron,0x…= Ethereum). Confirm on both ends before sending. - Pasting a mismatched address — a
0x…Ethereum address can’t receive USDT paid out on Tron, and vice versa. The receiving address must match the network you selected. - Sending the wrong amount — under- or over-sending can delay or re-rate the swap; contact support with your transaction ID.
- Setting the BTC network fee too low — a stuck deposit can miss the 30-minute fixed-rate window and re-rate. Use an adequate fee so your BTC confirms promptly.
- Skipping a refund address on a no-account flow — set one so a failed or below-minimum deposit has somewhere to return.
- Choosing floating on a large swap — fixed locks the BTC/USDT ratio against Bitcoin’s movement during confirmation; on a big conversion, that certainty is worth the spread.
- Not double-checking you’re on godex.io — godex.pro is a known scam. Bookmark the real one.
Converting Bitcoin to Tether is straightforward once you know which USDT network your wallet supports and choose a reputable swap service. Select the right receive network, verify the address matches it, confirm the quoted amount, and understand the difference between fixed and floating rates before sending your BTC. Taking these few precautions helps ensure your USDT arrives quickly and safely.
Frequently Asked Questions
Which USDT network should I receive on — ERC-20 or TRC-20?
Receive on the network your wallet actually supports and that you selected in the swap — the two must match. If you have a choice, TRC-20 (Tron) is typically the cheapest and fastest to receive, while ERC-20 (Ethereum) is the most widely supported by wallets and exchanges. Whatever you pick, confirm all three line up: your selection in the form, the receiving address you paste, and the network your wallet expects.
Can I convert Bitcoin to USDT without an account?
Yes. A non-custodial swap routes the trade wallet-to-wallet, so there’s no account, no balance held, and no ID. Godex requires no registration or KYC at any transaction size — including large swaps. You provide only your USDT receiving address (on your chosen network) and send BTC from your own wallet.
What happens if I receive USDT on the wrong network?
If the swap pays out USDT on a network your wallet doesn’t support — for example, ERC-20 USDT sent to a Tron T… address, or USDT arriving on a chain your wallet can’t see — it can be unrecoverable, with no undo. This is the most common way funds are lost on this pair. Always confirm the network you selected matches the network your receiving wallet supports before you send. If it does happen, save your transaction hash and contact 24/7 support right away — recovery is not guaranteed and is often impossible, but the TX hash is the one thing that gives you any chance.
Fixed rate or floating rate for a BTC to USDT swap?
| Feature | Fixed Rate | Floating Rate |
|---|---|---|
| Exchange rate | Locks the BTC/USDT ratio when you start. | Changes with Bitcoin’s price until the swap completes. |
| USDT received | Exactly the quoted amount (if the quote is still valid). | May be higher or lower than the initial estimate. |
| Best for | Large swaps or volatile markets. | Small swaps or stable markets. |
| Cost | Slightly wider spread for price certainty. | Usually the current market rate. |
| Note | Rate holds if your BTC deposit arrives within 30 minutes, so send promptly with an adequate fee. | No quote expiry, but the final USDT amount moves with the market. |
How long does a BTC to USDT swap take?
Usually a few to about 30 minutes. The main variable is Bitcoin’s deposit confirmation — its blocks arrive about every 10 minutes, slower than a stablecoin-input pair — then the USDT is sent almost immediately on your chosen network. On Godex the swap completes 5–30 minutes after the deposit is received. Read timing as “after the deposit is received,” not from when you click start.
Is it legal to convert Bitcoin to Tether?
Yes, in most jurisdictions. Owning and swapping BTC and USDT is legal for individuals in the US, UK, and most countries — both are mainstream, transparent-ledger assets. Tax treatment varies: a crypto-to-crypto swap can be a taxable event where you live. Verify the rules for your own location, and keep your transaction ID as a record.
What wallet and network do I need to receive USDT?
Any wallet that supports USDT on the network you choose. For TRC-20, a Tron wallet receives at a T… address; for ERC-20, an Ethereum/EVM wallet (MetaMask, Ledger, Trezor) receives at a 0x… address; for Solana, a wallet like Phantom receives at a base58 address. The key rule: the receiving address must be on the same network you select in the swap, and your wallet must support USDT on that network. If receiving into a centralized exchange, check which USDT networks it credits first.
Can I swap any coin to USDT, or just Bitcoin?
Any of 936+ supported coins. BTC to USDT is a common pair, but ETH to USDT, LTC to USDT, and others follow the identical flow: pick the pair, choose a rate, select the USDT network and paste a matching address, send the deposit, wait for confirmations. What every “to USDT” swap shares is the one extra step single-network coins don’t have — selecting the correct USDT receive network. For the exact screens, see the Godex walkthrough.
What’s the difference between Bitcoin and Tether?
Bitcoin is a decentralized asset backed by no issuer, with a supply capped by protocol and a price set by the market — no company can freeze a self-custodied BTC balance, but its value is volatile. Tether (USDT) is a stablecoin pegged to about $1 and issued by a single company that controls the token — its contracts can freeze specific addresses, but the peg is what makes it useful for parking value. Bitcoin is the volatile reserve asset you hold; USDT is the issuer-controlled dollar proxy you step into when you want stability.
Can I convert USDT back to Bitcoin (USDT to BTC)?
Yes. The reverse works the same way: set “you send” to USDT and “you get” to BTC, choose the USDT network your Tether is currently on (ERC-20, TRC-20, and so on), and paste a bc1… Bitcoin receiving address. Then send your USDT to the deposit address on the matching network. You can swap USDT to BTC on Godex directly, and there’s a full USDT to BTC how-to guide if you want the step-by-step for that direction.
What are the minimum and maximum amounts for a BTC to USDT swap?
There’s a small minimum — a floor that varies by pair and rate — and the exchange shows the live figure the moment you enter an amount, so check it in the widget. Sending below it triggers a refund rather than completing the swap. There is no maximum: Godex places no upper cap, so any volume swaps the same way, with no extra verification triggered by size.
How many confirmations does a BTC to USDT swap need?
The swap starts once your Bitcoin deposit reaches the required number of on-chain confirmations. With Bitcoin’s ~10-minute blocks, that’s the main wait on this pair — slower than a stablecoin- or Litecoin-input deposit. Once confirmed, the USDT is sent to your wallet on the network you selected, which settles in seconds to a couple of minutes depending on the network.
Can I cancel or recover a failed BTC to USDT swap?
Before you send your BTC, nothing is committed — just close the swap. Once your BTC is on-chain and confirming, the swap can’t be cancelled; it will complete and send your USDT. If a deposit fails — below the minimum, or a quote that expired before confirmation — the funds return to the refund address you set, which is why filling it in matters. If anything stalls, 24/7 support can help using your transaction ID.
Is converting Bitcoin to Tether taxable if I’m just hedging?
It can be, even when you’re only stepping into a stablecoin to reduce risk. Many jurisdictions treat a crypto-to-crypto swap as a taxable disposal event, meaning a gain or loss on the BTC may be reportable even though you didn’t cash out to fiat and are only “hedging” into USDT. Rules vary widely by country. This isn’t tax advice — verify the treatment for your own location, and keep your transaction ID as a record.
Does converting BTC to USDT affect who controls my funds?
Yes, worth understanding. A non-custodial swap is wallet-to-wallet: you send BTC from a wallet you control and the USDT lands in a wallet you control. The exchange never holds your funds on a balance — they’re only briefly in transit. One thing to note about the destination asset: USDT is issuer-controlled, so once you hold it, Tether (the company) technically can freeze specific addresses — a structural property of the stablecoin, not of the swap. Self-custodied Bitcoin has no such issuer; that’s the trade-off you’re making when you step into a stablecoin.
Start a Cryptocurrency exchange
Try our crypto exchange platform
Disclaimer: Please keep in mind that the content of this article is not financial or investing advice. The information provided is the author’s opinion only and should not be considered as direct recommendations for trading or investment. Any article reader or website visitor should consider multiple viewpoints and become familiar with all local regulations before cryptocurrency investment. We do not make any warranties about reliability and accuracy of this information.
Read more
Chiliz coin (CHZ) offers a compelling opportunity for traders interested in the intersection of blockchain technology and sports. By enabling fans to influence team decisions through the Socios app, Chiliz directly monetizes fan engagement and connects with major sports teams like Juventus and Paris Saint-Germain. These partnerships not only enhance the platform’s visibility but also […]
The exponential growth of Bitcoin Satoshi Vision (BSV) against the general bear trend on the cryptocurrency market in autumn 2019 has impressed the community. Due to the increasing market capitalization, the newly emerged altcoin was ranked 5th on CoinMarketCap and managed to maintain its high position at the beginning of 2020. In the article we […]
EOS is definitely on the list of the strongest and most stable projects in the crypto world. Despite the fact that the currency entered the market less than 3 years ago, it consistently occupies one of the top 10 places in the rating for project capitalization. it is often called the “main competitor of Ethereum”. […]
XRP price prediction 2026-2027: bear, base, and bull scenarios with ranges and named sources, the resolved SEC case, live spot ETFs, and can XRP reach $10?
In this article we will talk about Ripple (XRP) and its price prediction. What is Ripple (XRP) Ripple is a San Francisco-based startup that was launched in 2012 by Ripple Labs as a global network both for cross-currency and gross payments. Ripple history began in 2004 with the discussions around the digital coin in the […]
You may well think that an article dedicated to a Tether price prediction or the Tether price in general is a little bit strange — it is a stablecoin after all. However, the price of Tether does fluctuate significantly, although it is nowhere near as volatile as non-stablecoin cryptos. This means that staying up to […]